Greetings, worldsmiths! Since you’ve had a taste of CSS, we’ll hit a few more basics this month.
What we’ll cover:
Classes, IDs, and Elements – Oh My!
When you see CSS Blurbs like the one below, do you know what each part is or how to find out in Inspect?
.user-css #world-menu .world-menu-subcategory a[href*=umeji-tatsuya-article]
If not, we’ll talk about them briefly and then I’ll point you to a reference you’ll want to bookmark. Knowing what these are will be a lifesaver!
Classes
. = what you put in front to reference these. Classes help you style/refer to elements as a group.
If we right click on a page to bring up Inspect say just by the world codex, we’ll see something like the following.


Ids
#= is how you reference ids. They mark a place in the HTML code, by giving that section a name. One use for these is making a link you can jump to in a document. Another is to give a section it’s own styling.
If we right click and inspect our time line, we’ll see something like the following.
![]()

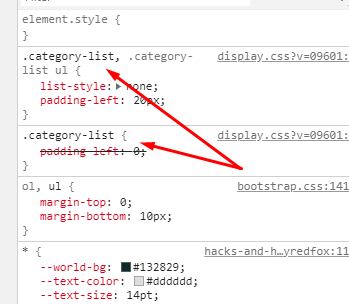
Below is how I used it in my CSS for my Hacks and Help page, since timelines aren’t relevant the site.

HTML elements/tags
Have no character in front. Think h1, img, a, etc.
When we right click on the world codex title, we’ll get something like the following in inspect.


Attributes
They are surrounded in ‘[ ]’. They’re aspects of the HTML elements like the URL (href) of a link, or src/url of an image.
If we want to affect only a specific element, we can use it’s attributes to help specify it in our code. Below I inspected a link to the reference for this article.


For our example I colored only that link pink with the following.

‘*=’ says pick the elements that contain what ever is after it in the line of code. And ‘\’ tells our CSS that the ‘.’ special character doesn’t mean what it usually does in CSS. So we can use it as a file extension marker. It’s called an escape character. See this article for more information.
Put It Into Practice
So if we decode the CSS line:
.user-css #world-menu .world-menu-subcategory a[href*=umeji-tatsuya-article]
It references:
- the classes .user-css and .world-menu-subcategory
- the id #world-menu
- the HTML element a (a link)
- we’re using ‘*=’ to specify only those links that have ‘umeji-tatsuya-article’ in the URL (href)
Each class, id, and element/tag is listed from top/most over arching element to the most specific element we want to refer to. Ids are often quite specific for a page’s code. So they’re great for narrowing down a class or element to affect with your CSS.
Note:
Items you see with a ‘:’ or ‘::’ are pseudo elements and pseudo classes. We’ll talk about those in another article, or you can read about them here.
References
CSS Selectors (W3 Schools)
Venture forth and use Inspect!
I hope this little explanation helps you customize your world’s look!

Tip: Statblocks for Snippets You Use Multiple Times–Grandmaster +
Let’s work hard to be lazy. Why make ourselves update an item in more than one place? So you might want to use statblocks (also known as blocks or sheets) to your advantage. When you update a block, it’s updated in every article you’ve used it in. Here are a few examples.
- In my Hacks and Help world, I have blocks to state if the article is for Journeyman+ or Grandmaster+.
- In my Liminal Chronicles world, I have blocks to state how many hidden secrets are on a page.
If you haven’t used blocks yet, this quick overview will get you started.
How to Create Statblocks
To access this handy feature in WA – go to your dashboard menu Statblocks->Your Statblocks and from the drop down menu at the top of the page, select what kind you want to make. I usually use ‘Generic, Text’ to create a snippet of info. Then click ‘Create a new sheet’.
Then just fill in the information like you would for an article.

Save it, and view it.
Note: any styling you have for your world won’t be applied to the block. To really see how the statblock looks, you’ll have to put it in your world. Try it on a draft article or in a test version of your world, before deploying it officially.
How to Use Statblocks
After you view the statblock or from the sheets list you can copy the block code. It looks like this:
[block:XXXXXX]
From the sheets list you can copy the block code too – just click the number beside the corresponding statblock.
Paste that puppy where you need it. Statblocks are great for putting into a sidebar. Here’s what one of mine looks like.

Notes:
Check out the codex page for more details.
Coming Soon
Our next interview will be with Damion Otter (you may know him as Oneriwien on WA and the Discord server).
Make Your World Look Awesome!
Let us know how you use these ideas. We’d love to see your creations posted in the WA Discord #guild-showcase.
Until next time, my fellow smiths. Go light up the forge!